ArcLearn is the web-based solution to your business learning management needs offering licensed video courses developed by the premier producers of business-skill training materials.
ArcLearn courses are delivered directly to the student’s PC - anytime, anywhere there’s an Internet connection. Administrative functions such as registration, enrollment and assessment record keeping are hosted on our secure server. Students can self-select their own curriculum or they can be enrolled in required courses by your in-house training coordinator.
This guide offers you a quick study of the basics of ArcLearn. Since different organizations use ArcLearn differently, this guide might contain features that do not apply to you.
Click on the heading of interest ... information will be presented.
-
Just getting started? What is the easiest and fastest way to get started? In this scenario, we assume that you only have a few students and a few courses licensed.
The first step is for an administrator to license the desired course(s). Find the desired course, and purchase a license. Purchases can be by credit card or through the sales support phone number available on the Contact Us menu tab.
The second step is for the administrator to add the participants. See Adding new participants to ArcLearn elsewhere in this quick start guide.
Now, any registered participant can go to www.arclearn.com and login.- Go to the Courses dropdown menu and select Licensed Courses. From this list, click on Add to Your Courses.
- Go to the Courses dropdown menu and select Your Courses. Click on your desired course and begin taking the course.
-
A trainer or administrator can use ArcLearn to view the DVD Style video for use in a classroom or group setting.
To stream the DVD Style video, go to the www.arclearn.com site; use the Licensed Courses in the Courses menu dropdown. Click on View Details. There is a Video Access tab near the bottom; click on it. Then, click on the appropriate “Play Video” button depending on the resolution desired. All video can be played in full screen for a better classroom or group presentation. -
An administrator can review existing licenses by selecting License Management under the Site Administration menu drop down.
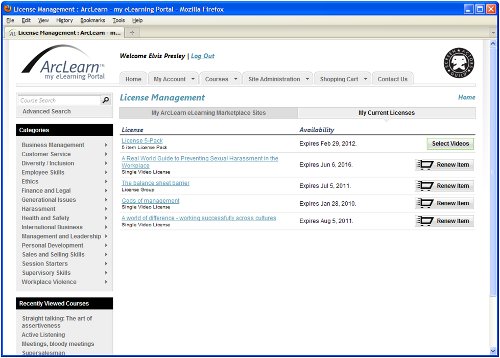
To purchase a new license for any course, click on the Purchase License tab on any program's detail page. Or, call your distributor for personalized help and assistance.
If you purchase a new license for a program that you already have licensed, any unused plays on the old license will be extended. -
The features available within ArcLearn depend upon one’s role as an ArcLearn user. There are three roles: 1) participant; 2) trainer; and 3) administrator.
Under many circumstances, the initial purchaser of the ArcLearn license is the ArcLearn administrator. The administrator has the responsibility of getting the organization started with ArcLearn. This could be as simple as adding one additional ArcLearn user and then assigning that person the administrator role to continue any necessary setup.
The vast majority of ArcLearn users will be participants. A participant is someone who uses ArcLearn for training, but does not have a trainer or administrator role. The participant can either be assigned training by a trainer or administrator, or can select training from the company’s list of licensed courses.
A trainer is typically a person in a training department or a supervisor who has the responsibility for the training of others. The trainer can preview courses including both licensed and not licensed courses, can assign licensed courses to others, and can review training results of others through either ArcLearn Student screens or ArcLearn reports.
An administrator has all of the capabilities of a trainer PLUS special capabilities to administer ArcLearn preferences for the organization. Such additional capabilities include setting up the help desk screens, overriding some course parameters, and licensing additional courses.
For a small company, small department, or trial use of ArcLearn, you can operate quite successfully with one administrator and multiple participants. Larger or more sophisticated use of ArcLearn could involve the assignment of multiple trainers and multiple administrators. -
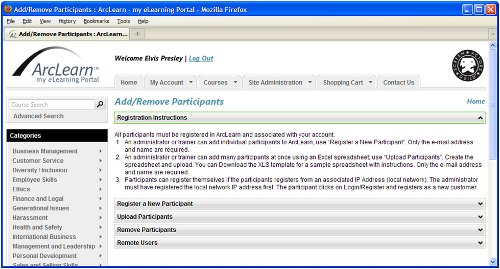
All participants must be registered in ArcLearn and associated with your account.
- An administrator or trainer can add individual participants to ArcLearn. Only the participant’s e-mail address and name are required.
- An administrator or trainer can add many participants at once using an Excel spreadsheet. Create the spreadsheet and upload. You can download the XLS template for a sample spreadsheet with instructions. Only the e-mail address and name are required.
- Participants can register themselves if the participant registers from an associated IP Address (local network). The administrator must have registered the local network IP address first. The participant clicks on Login/Register and registers as a new customer.
To add new participants, the trainer clicks on the Trainer drop down menu or the administrator clicks on the Site Administration drop down menu. Click on the Registration Instructions for more assistance.
To add just one or a small number of participants, click on Register a New Participant.
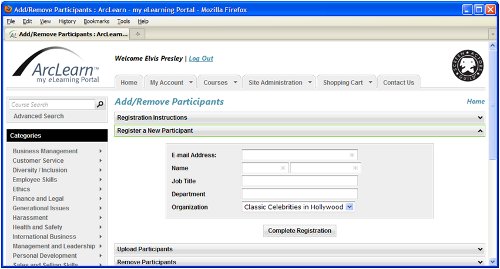
Enter the person’s e-mail address and name. The job title and department are optional and can be added later; these might be useful in later searching and selecting participants for Course Assignment.
-
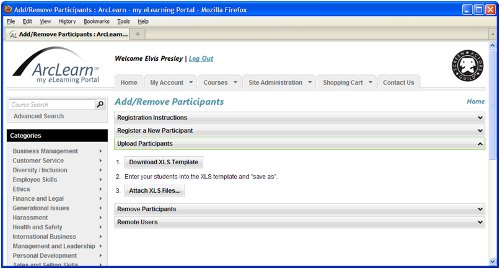
To register many participants at once, it is easy to enter the information into an Excel spreadsheet which is uploaded and then updates ArcLearn all at once. Click on Upload Participants.
It is helpful to download the XLS template first; this spreadsheet has all of the options and rules. The template can be used to enter your data; once all entered, the spreadsheet is uploaded. You receive an e-mail with the upload results.
Note: once any person is added to ArcLearn, he or she will receive an e-mail with their assigned password. With one’s e-mail address and assigned password, he or she can log into your ArcLearn account and begin using ArcLearn. One can use the Your Account menu dropdown to change their password as they see fit. -
You manage who is considered a participant, a trainer and an administrator. Typically, most employees are participants; this is the default privilege level for all newly added people.
Trainers have additional responsibilities for assigning courses and reviewing reports. Administrators have all privileges of a trainer, plus he or she has other site administration responsibilities.
The administrator should select the Site Administration option under the Site Administration menu drop down. This panel provides several administrator functions. Click on “Privileged Users”.
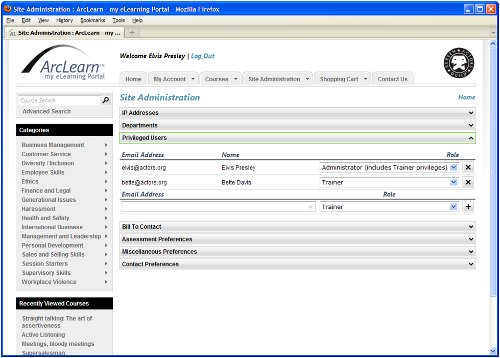
This panel will list all privileged users and provide an entry box for adding a new privileged user. New privileged users are originally participants by default. Enter the participant’s e-mail address and select the proper role for this person (either trainer or administrator). Click on the Add icon.
Existing privileged users can be changed. To change a person’s status from trainer to administrator (or vice versa), you will change the role in the role drop down by the person’s e-mail address and name.
To return a privileged user back to a participant status, use the X delete icon. You are not deleting the user, but you are only deleting the privileged status of the person. -
All participants will have a menu option for “Contact Help”. This is meant to easily communicate with someone within your organization to answer first level questions.
Typically, you assign someone with at least trainer privileges to provide help to participants.
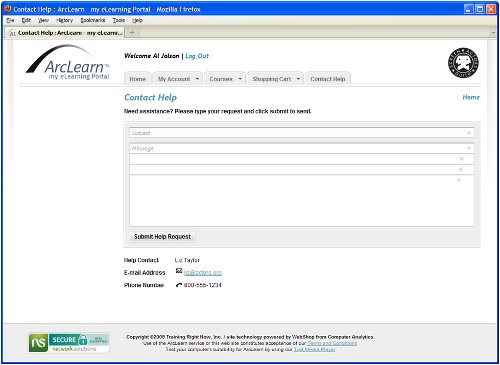
The administrator should select the Site Administration option under the Site Administration menu drop down. This panel provides several administrator functions. Click on “Contact Preferences”.

You enter the name, the e-mail address, and the phone number of your internal help desk person. Often, this person will be a part of your training department.
With this entry, a participant will request help by using the “Contact Help” on their ArcLearn pages. Following is an example of what they will see. They can enter information and click on Submit; an e-mail is sent from the ArcLearn server to the help desk person.
-
Participants use the site by going to www.arclearn.com and logging into the site. The primary jumping off point for a participant is the Courses drop down menu. The most common activities are:
- Taking an already selected course from the Your Courses panel
- selecting a course to take by selecting the Licensed Courses list
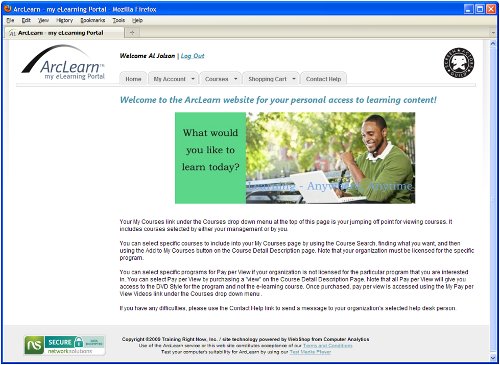
Following is a sample home page for a participant.
Under the “Courses” drop down menu, one can click on “Licensed Courses” to see a list of courses. He or she selects the course by clicking on “Add to Courses”. Once the course is added, one can take the course by going to the “Your Courses” panel (under the “Courses” drop down menu).
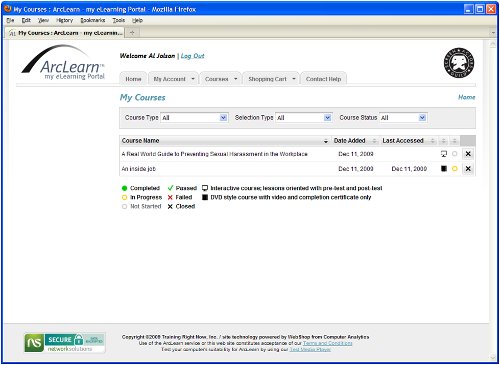
One can take a course or continue an existing course in one’s list by clicking on it in the Your Courses list. This starts the Course Viewer.
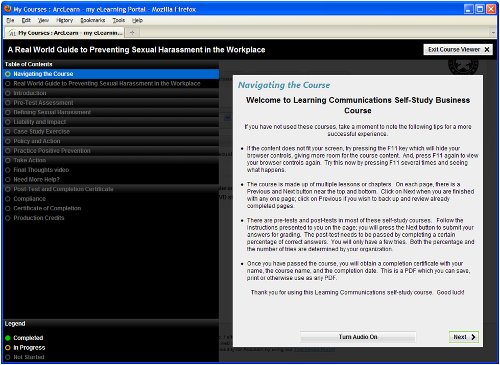
The participant will progress through the course at his or her own pace. A table of contents is displayed to the left, highlighting the current lesson. The participant would click on the Next button to get to the next lesson. One can always go back to a previous lesson by clicking on a table of contents entry or by clicking on the Previous button.
Some courses have various textual panels, audio assist (useful for visually impaired), tests and quizzes, video, and more. Different courses will have different styles and complexities.
Once a course is started, the participant can suspend the course by clicking on “Exit Course Viewer”. When he or she returns, ArcLearn will bring them back to the spot where the course was suspended. The participant can use the left side menu to review already viewed material again. When the course is completed, the participant will obtain a Completion Certificate.
Participants will not be able to continue or review a course that has already been completed. However, he or she can add the course back to the Your Courses list to take it again. -
To assign courses to participants, the trainer will mouse over the Site Administration drop down menu or the Trainer drop down menu, and select Assign Courses. This feature allows a trainer to assign one or more courses to one or more students. Once complete, the trainer has the option of letting the system send an e-mail to each selected participant.
Assigning courses is a three step process:- Select the participants
- Select the courses
- Finalize the action
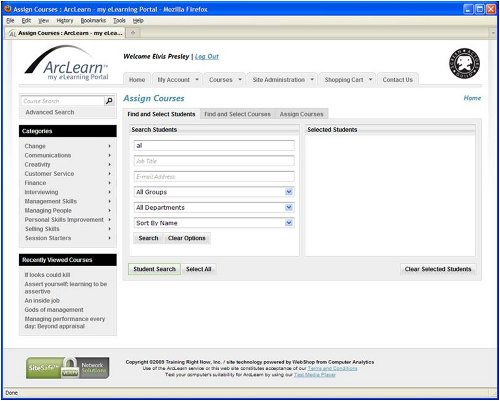
Step one is to find and select students. Use any of the search criteria; use a partial name or e-mail address to get groups. Click on Search. This displays a list. Drag and drop the names from the left list to the right list “selected students”. Go back and do more searching until you have the full list of new course attendees.
Step two is to find and select courses. If you only have a few courses licensed, use the “Select a Course by Product”. If you’ve got the right one, drag it over to the right Selected Courses list. Do this until you are happy with the list.
Step three is to finalize and Assign Courses. Select a course type (recommended or required), a target completion date (optional), and whether you want to send an e-mail to the students. Uncheck the box if you do not want to send the e-mail. The e-mail provides a list of the courses and a personal message that you can enter into the message box. Press Assign Courses to Students and you are done. -
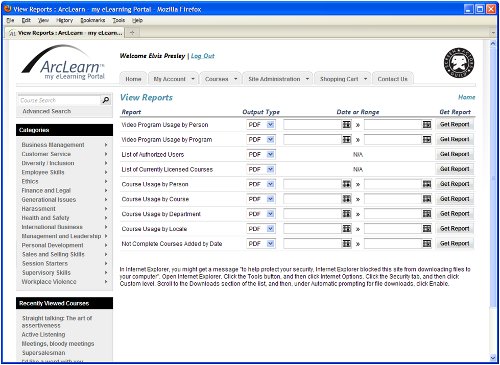
Reports are available to both trainers and administrators. Select View Reports under the Trainer or the Site Administration drop down menu.
There are various reports and most are available as either a PDF report to be viewed/printed or a Excel spreadsheet for additional user processing. Some reports allow the selection of a date range if dates are logically appropriate for that report.
To run a report, select the output type and the date range. Click on Get Report. The PDF or the Excel document will be displayed either in your browser or outside your browser, depending on how your PC is setup.
-
If your organization has licensed three or more courses, you are eligible for free basic customization. This includes: a) your logo in the top, right of each ArcLearn page, and b) a custom participant’s home page with text, images, and more.
To take advantage of either or both of these customization options, do the following:
For the logo, provide your logo as a jpg, gif, or png image. The size is limited to 270px wide by 70px high. It is recommended that the background be either white or transparent. Usually, a 10 to 20K image size is sufficient. Send the image to service@trainingrightnow.com along with your account number (found on the Your Account panel).
For the custom home page, prepare HTML along with any images. You can link to your images from your own site or provide such images along with the HTML. Design the home page area with a maximum width of 740 pixels. The height is flexible, but do not make too long as this will unnecessarily increase the size of the page.
The customization area is the area of the participant’s home page BELOW the top menus and ABOVE the grey footer. Below is the standard participant home page showing the “welcome” line, the image, and the text below.
Note: if your customization requires programmer assistance, you will be billed for time and materials.

All customization objects must be e-mailed to service@trainingrightnow.com along with the objects and your account number. -
One can copy links from ArcLearn and paste into PowerPoint or other authoring tools. You can:
- copy links from ArcLearn to use in PowerPoint and other authoring tools.
- access video chapters when available
- download play licenses in advance of a training session which is essential if Internet access is not available.
If the trainer will be projecting video to large screen or if Internet bandwidth is limited, please consider the Local Access Option. Wtih this, the trainer can connect a local hard drive of all ArcLearn video to a laptop. Then, all video is played at DVD quality and no Internet bandwidth is used.
The video on the external hard drive is DVD quality and is much more suitable for full screen display, large flat screen display, or for projected display. The purchase of a Local Access Option ships one such external hard drive.
